INTRODUCTION
FUNCTIONS AND APPLICATIONS
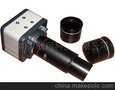
The USB UV CAMERA is a new electronic product for the micro object observation under lightings both while andultraviolet(UV). It is a tubular imaging system consisting of an optical lens, an image sensor, two groups illumination mechanism, white light LED and UV light LED, and an image transfer control circuit connected to a computer. You can display the images captured by the USB UV CAMERA on the computer screen, store them on the computer, print them, or send them over the Internet.
APPLICATIONS
- · Inspection of industrial parts
- · Dermatology
- · Quality control
- · Engineering teleconference
- · Research and analysis
- · Science learning
As a USB microscope, it can magnify stamps, coins, antiques, insects, electric circuits, machines, hair, skin, fabrics, food, decorations, etc.
ATTENTION
Before installation and use of this product, please read the instructions in this manual to ensure its correct use.
SAFETY INSTRUCTIONS
Before using this product, please carefully read the following safety instructions.
SYSTEM REQUIREMENTS
For best picture quality, the following specifications are recommended:
1. Windows XP, Vista, Windows 7 or MAC version 10.4.2 to 10.5.2
2. 128M RAM or above
3. At least 2 USB port (For best effect, USB 2.0 port is recommended).
4. CD-ROM and a 40G or higher hard disc.
TECHNICAL SPECIFICATIONS
1. DSP: Digital Image Monarch Processor.
2. Sensor: high-quality CMOS sensor, 2M pixels
3. Resolution: 1600×1200
4. Colors: true color 24bit (RGB)
5. Interface: USB2.0.
6. Frame rate: 30 frames/sec (CIF and VGA).
7. UVexcitation wavelength 375nm
8. Magnification: 50×
9. Size: 32mm in diameter, 92mm in length
10. USB cable length: 1.8 meters
11. Image freeze: just rap space bar
12. Timing snap: 10 seconds
PACKING:
GIFT BOX | SIZE | 18.5 X 12.5 X 7cm |
QTY. | 1 PC | |
WEIGHT | 0.4Kg | |
CARTON | SIZE | 36 X 40 X 26 cm |
QTY. | 20 PCS | |
WEIGHT | 9.5Kg |
INSTALLATION
To avoid mistakes in the installation process, please strictly follow these steps:
Place the included CD into the CD-ROM drive.
Find the icon of ‘ehe.exe’.
Copy the ‘ehe.exe’ to your PC. Just copy but never try to install it.
Plug the HANDHELD MICROSCOPE into the USB port, and double click on the icon of ‘ehe.exe’ to open the image window.
DIRECTIONS FOR USE
Properly connect the USB UV CAMERA to the computer . After a short while you should see the image captured by the USB UV CAMERA on the computer monitor.
OPEN IMAGE WINDOW
Double click on the icon ‘ehe.exe’ to open an image window on the screen. After a few seconds the camera will begin to take image in the window. If the picture came from your PC camera or any other device please click on ‘Device’ on the top line of the image window and open the pull down menu. Choose the proper USB camera and close the pull down menu.
Click on ‘OPTIONS’ and click on ‘VIDEO CAPTURE PIN’. Click one of image window size in the drop-down menu and click on ‘OK’ to confirm.
FOCUSING
The focusing ring is at the handle of the USB UV CAMERA.While the focusing ring is rotated it adjusted the distance between lens and sensor for getting the clear image.
Please keep the head ofUSB UV CAMERA tightly and snugly touching the surface of the object during the focusing and observation.
CHANGE LIGHTING
Push down the light button that is located close to snap button to choose white light or UV light or turn off the lighting.
WARNING
If there is no operation within 5 minutes the lighting will be turn off automatically.
TAKE PHOTOS
Click on ‘option’ on the top of image window.
Then click on ‘ high resolution’ in the drop-down menu to make sure there is tick mark here.
Close the drop-down menu.
Push down the button of the dimmer that located on the USB cable to freeze an image.
Or click ‘snap’ on the top of image window to take a photo.
The photos you have taken will be saved in the computer and display an icon on the screen.
If your system could not freeze an image please follow steps to make it works:
1, click on ‘file’ that is on the top of image window.
2, click on the ‘set photo folder’
3, designate the folder you want to save the photos
4, click OK to confirm
MORE WAYS TAKING PHOTOS
Click on ‘option’ on the top of image window.
Then click on ‘ high resolution’ in the drop-down menu to make sure there is no tick mark here.
Close the drop-down menu.
Now you get below functions:
IMAGE FREEZ
Please rap the space bar for freezing an image.
If you want to save this image you can rap the return key for saving the image as a photo.
Rap the space bar again to activate the image window.
TIMING SNAP
Rap the F5 key to arouse a timing snap.
The snap will be delayed 10 seconds after the key was rapped company with beep per second.
If you could not get a clear photo by push down the snap button the timing snap may be a help.
RETURN KEY SNAP
Just rap return key to take a photo.
WARNING
The top line of the image window will be blue color while it works properly. It will be changed into light blue when user operates on background and the snap function will be lost during this color.
Just click any where inside of the image window to change it back to blue.
TAKE VIDEOS
For taking a video:
1, click on ‘video capture’
2, click on ‘Set Time Limit’ and input how many seconds the video you want to take and tick the ‘use time limit’
3, click on the ‘capture’ again
4, click on ‘start capture’
5, click on ‘OK’ to start to the record
The video will be taken and stopped automatically when time out.
The video is an AVI format.
APPLICATION PHOTOS
LIMITATIONS AND EXCLUSIONS
Please keep all the receipts of your purchase in a safe place. You need to produce the unaltered and original receipts to receive warranty coverage. Otherwise, the warranty is voided.
The warranty only covers the product if it is used under normal operation conditions. However, the following are not covered by the warranty:
Damages resulting from unauthorized disassembly or assembly of the products by the customer
Damages caused by fitting of improper components to the product
Damages resulting from unauthorized attempts to repair or to alter the product
Gross distortion, scratches, discoloration, or damage of the covering
Cracks, scratches, and mold spots on the lens
COMS sensor is burned or apparently scratched
Damages to the PCB board (such as burned PCB board) due to misuse