General
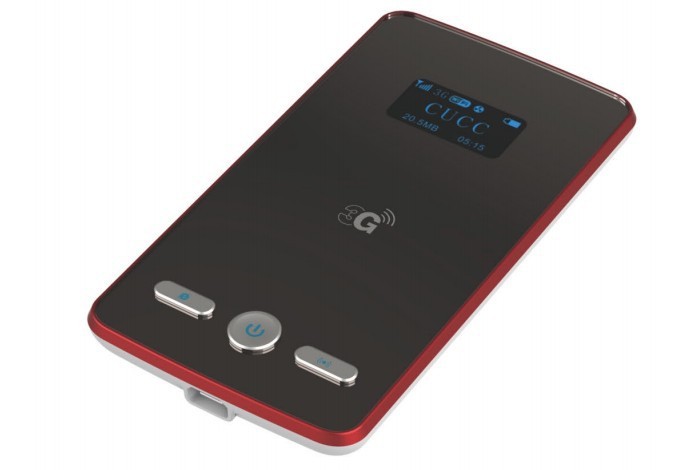
The WF109 is a MiFi Designed by Macroinfo and can provide internet access for up to 5 devices as WiFi Hotspot.
The MiFi support WCDMA,up to 7.2Mbps. Carrier in your pocket, you can stay online anytime and anywhere. You will experience high-speed surfing and steady connection, characteristics of a true 3G era!
The WF109 support high speed WiFi transfers, user can share mass multimedia file in the inpidual WiFi LNA.
It is pocket size and allow users to access the Internet through any Wi-Fi device, mobile phone, game console, digital camera, notebook, personal digital assistant(PDA) and MID.
It is portable and exquisite.


Features
2.1 Offer more value with MiFi OSTM
In addition to connecting up to 5 Wi-Fi enabled devices to the inpidual WiFi LNA simultaneously and securely. The MiFi WF109 offering services other mobile hotspots can’t, such as data usage monitoring and easy shared connections management, including a variety of power-management options to maximize battery life off a single charge.
2.2 High-speed 3G network
Download speed of WCDMA up to 7.2Mbps, experience high-speed surfing really.
2.3 Totally portable, totally reliable
The MiFi WF109 is a compact, wireless, connectorless, and rechargeable intelligent mobile hotspot with over 5 hours battery life(280 hours standby). The OLED not only display clearly, but also doesn’t drain your battery like other LCD screens.
2.4 Detailed information for view
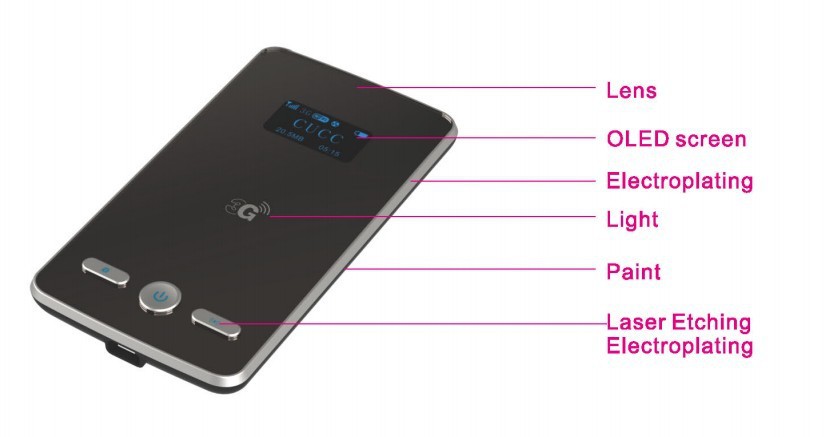
The OLED display detailing information such as signal strength, Data usage, 3G or HSDPA connectivity, number of devices connected to the hub, battery level, and the network being used.
2.5 Easy setup and configuration
One-touch connectivity and pre-configured security gets customers up and running in no time with no software to install. Customization is simple and intuitive: users just power it on, enter their password and connect.
2.6 Session persistence
Experience life in the fast lane without stop-and-go traffic. The MiFi WF109 supports session persistence/session continuity during the transition between 2G,3Gand WiFi without interruption.
Product Form
WF109 support LED (optional) or OLED Display
Form(OLED):
can display signal strength, network, number of WiFi client, connect status, battery level, work mode, roaming notice, name of Carrier

Function
Item | Description |
Network | WCDMA、GSM |
Band | WCDMA/UMTS:2100/900Mhz EDGE/GPRS/GSM:900/1800 |
Data Speeds | Support HSPA Download up to 7.2Mbps Upload up to 384Kbps |
Battery | Recharge、Removable battery 3.7V/1500mAh Standby time up to 250 hours 5 hours active use, better than other production |
WLAN | Support WPA、WPA2 and WEP Support DHCP Support 802.11 b/g Support AP, up to 5 WiFi client can access Support automatically/manually open WiFi |
WIFI Intelligence power control | Support intelligence power control, enhance the battery life |
MiFi OS | Web-based UI for device management |
Intelligence LED (optional) | Support network、Battery、Signal、Roaming、WiFi status with 5 LED |
Intelligence OLED | Support network、Battery、Signal、Roaming、WiFi status、Carrier、data usage、connect time etc |
SD Card | Up to 32GB SD share |
Auto connect | One-Touch power,automatically connect to Internet |
Wake up | One-Touch wake up, access to Internet anytime and any where |
Driver | Support Autorun |
Interface | Micro USB port,Support high-speed USB2.0 |
Temperature | -10℃~+55℃(Normal) |
Size | elegant , thin,fashion 90mm*52mm*9.5mm |
Operating system | WindowsXP/2000,Vista,Win7,Mac,Android, Linux |
|
|
|
1.Power button
When it is under shut-off status, press the power button and hold for more than 4 seconds for startup, and after startup, press it (more than 4 seconds)for shut-off.
2.WAN port socket
Plug in the cable, press the power button for startup, and after cable dial-up is successful, it will be transferred to WIFI router.
3.Reset button
When the system is electrified, press this button (for more than 2 seconds), then the system will be restarted automatically, and restored to the factory default state.
1.2 System requirementPrior to installing this router, please ensure that your computer satisfies the following requirements:
CPU: Basic frequency should be 500MHz at least
? Hard disk: 50MB space available at least.?
Operating system: Windows 7/VISTA/XP (Above SP2-grade version)
? Display resolution: 800×600 pixel or higher(Recommended:1024 × 768).
? Interface: Standard USB 2.0 interface.
? Network browser: Internet Explorer 6/7/8, Safari3/4/5, Fire Fox, Chrome.?
2Directions for use2.1 Hardware installationBefore setting the router, please make correct connections as the following steps:
1) Insert UIM card into SIM card slot;
2) If file sharing is required, please plug Micro-SD card into the card slot;
3) Load battery;
4) Load battery rear cap;
Your terminal device may get access to L10 through USB or WLAN to realize network connection.
◆ Connect through USB data line (data card mode).
1) Connect L10 (in shut-off state) to the computer through USB data line
2) When the computer is connected with L10 for the first time a setup procedure will pop up, and you only need to follow the setup steps
Note: if automatic running of the CD is prohibited, please initiate the setup.exe file under the directory of this CD. Please refer to the setup_cn.pdf file under the directory of this CD for detailed directions for the setup procedure.
3) After it is connected, the system will automatically pop up a client procedure, and you will only need to click the button to connect the network.
Note: Please refer to the Help menu for detailed directions for the client procedure.
u Connect through WLAN (Router mode).
1) Press L10 power source button and hold for more than 4 seconds to start it up.
2) Your terminal device may get access to L10 through WLAN mode. SSID format of L10 should be "WIFI******" and its default access code is "01234".
2.2 Router administration page introduction2.2.1Administration page login
Connect L10 through WLAN mode, open Web browser and type "http://192.168.8.1" in the address bar and then press Enter button, the homepage will be opened as follows:
2.2.2Status information
The display status information for dial is as shown in the following table:
Status information | Explanation |
Wireless broadband(3G/4G/1X)network signal intensity |
Signal from weakest to strongest |
Quantity of battery electricity |
Electricityquantity from smallest to largest |
Network status | Network is not connected Network has been connected Network connection is undergoing |
2.2.3Login
Click "Login" in the homepage and enter the following page:
Input default user name: admin, default code: admin, Click "Login" button to enter the page as follows:
2.2.4WiFi setting
Click "Wi-Fi" to enter the setting page
There are two WiFi configuration files, one is of open mode and the other one is of safe mode. After selecting a configuration file, click "Edit" button to edit the setting as follows:
Set the following items:
■ Network name (SSID):This name will be displayed in other wireless devices to indicate your wireless network.
? ■ Wireless channel: Choose one channel from the list.
? ■ Safe mode: Choose one safe channel from the list.
? ■ Network key: Set network key according to prompts in the page.
Note: This setting will become valid after restart.
2.2.53Gconfiguration file
Click "3G Configuration" to enter the setting page
Choose a corresponding operator from the drop-down list of the configuration file, and then the network selection, user name, code, number and APN number below will be filled in automatically, and only when WCDMA card exists the APN option will be valid. When Auto is selected for configuration file, the software will automatically judge the operator according to the plug-in card and conduct autodial.
Note: This setting will become valid after restart.
2.2.6WAN port setting
Click WAN port setting to enter the setting page for wired connection
The software supports 3G dial and wired WAN dial, and the default mode is 3G dial. When the cable of WAN port is plugged in, it will be automatically switched over to wired dial mode. To return to 3G dial, unplug the cable. There are two wired dial modes, one is ADSL dial and the other one is dynamic address allocation dial. The user may choose an appropriate network mode according to his environment and set appropriate parameters. Both default 3G dial and PPPOE dial modes are automatically connected.
3Warning and precautions 3.1.1Electronic instrumentsShut it off near to high-precision electronic instrument, or otherwise it may impact their performances. These instruments include audiphone, heart pacemaker, fire alarm system, automatic door and any other automatic equipment that may be impacted. If you are using an electronic medical facility, please inquire the facility manufacturer whether the radio wave may impact your operation.
3.1.2Hospital
The following points should be observed in a hospital or medical facility:
- Do not bring your wireless router into a surgery, intensive care ward or heart intensive care ward.
- Do not place magnetic storage media such as magnetic card and floppy disk near to it, as its radiation may erase the information saved in them.
- Do not place your router and its accessories in a vessel containing intense magnetic field like an electromagnetic oven or microwave oven, or otherwise it may result in malfunction of the router and even a fire or explosion.
- Do not leave your router in extremely cold or hot places, or otherwise it may result in product failure, fire or explosion.
- Do not allow your router to suffer severe bumping or electric shock, and doing so may cause wireless instrument failure, superheat or explosion
- Place your router out of children's reach. Do not allow children to use it without directions.
- Do not allow children to put it into mouth cavity.
- Do not allow children to touch small fittings, or otherwise the children may swallow them and result in asphyxia or dysphagia.
- It is not water-resistant, so please keep it dry. Prevent it from contact with water and steam. Do not touch it with wet hands, and doing so may result in short circuit, product failure or electric shock.
- Do not use it in dusty, humid and messy places or place with magnetic field, or otherwise a line fault may be resulted.
- Do not use it outdoor in a thunder and lightning storm.
- It may interfere the nearby TV set,radio receiver and computer.
- According to the international radio frequency standard, only accessories approved by the manufacturer can be used.
- Before cleaning or maintaining it, please shut it off and disconnect it from power, or otherwise a short circuit or electric shock may occur.
- Never clean it with chemical detergent, detergent powder or other chemical agents (such as alcohol and benzene), or otherwise a partial damage or fire may occur. Wipe it with a antistatic dampish soft cloth.
- Never scratch its enclosure, or otherwise the uncased paint may result in skin allergy. Once this case occurs, immediately stop using it and go to a doctor.
If it or any of its accessories does not work, please consult the local authorized service center for help.


