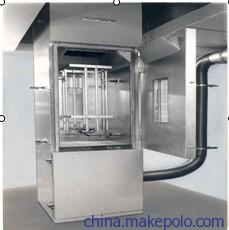

德国Wazau大燃烧室建材烟密度试验仪满足标准DIN4102第15部分,DIN50050第二部分,主要用于测定建筑材料燃烧产烟气浓度。
Validating the burning cabinet
1.reference sample
Length: 1000mm, width 1000mm, height 3800, weight about 1000kg
2.gas supply unit located in the control rack for the burner with all fittings and measuring device for air flow, propane gas and CO2 extinguishing unit, compressed air as well as the pipes, weight about 250kg
3.Electrical supply and control rack with displays, weight about 200kg
4.PC with data acquisition and control software
Delivery time: 3months
Delivery time: 50% prepaid by T./T; 50%within 30days after receipt of good
供应摩擦磨损试验机 进口摩擦磨损试验机 德国TRM系列摩擦磨损试验机
采用模块化设计,以便于根据用户需要调整或扩展。采用空气轴承及高精密传感器(带自动偏移调整功能),随机提供专用失措
应用领域:轴承,润滑剂,无尘室,齿轮, DIN试验研究,EN试验秉持量保证
塑料ISO试验副产品试验图层,人工材料,运动模式:滑动,振动,振荡
The Wazau tribometer serves for the investigation and simulation of friction and wear processes under sliding conditions. It can be operated for solid state friction without lubrication and for boundary lubrication with liquid lubricants. Thus both material
and lubricant tests can be executed.
According to the standard test principle a stationary test specimen (pin or disc) with a defined normal force is pressed against the surface of a rotary disc. Both specimens are perpendicularly arranged one on the other whereby the rotary disc is on top. Other test configurations are possible. The normal force is applied by the movable drive block and the drive spindle. The normal force is damped by means of a spring located below the linear table. The tribometer is driven by a servo motor steplessly adjustable from 0.1 rpm to 3000 rpm.
The actual test equipment essentially consists of the motor unit, the drive and the load section. The shiftable modules are one on the other fastened to two perpendicularly columns. Pin and disc are in a specimen pot heatable up to approx. 150
¡ãC. During the test the normal force, the temperature inside the pot, the linear wear amount of both specimens and the
friction torque are continuously measured.
The measurement of the normal force is done by a force sensor arranged between counter load spring and lower specimen restraint. The temperature is measured by a NiCr-Ni-thermocouple in the pot. The wear is measured over the changing displacement between lower and upper specimen restraint. The measurement is done contactlessly by a laser-optical displacement sensor. The friction torque is measured by a rotary torque sensor.
All measuring signals are transferred to the control rack to be conditioned there. Data acquisition is done by an USB measuring module with a solution of 16 bit. The measured values of rotational speed and temperature are digitally monitored with temperature values sampled at 2 Hz and rotational speed sampled at 5 Hz.
Strain collective
Type of motion Sliding
Mode of motion Continuous
Normal force By means of a drive-
spindle system adjustable from 5 ¨C 1000 N
Rotational speed From 0.1 to 3000 rpm steplessly adjustable
Testing temperature From RT to 150 ¡ãC steplessly adjustable


